Did you know that you can navigate the posts by swiping left and right?
Serverless Image Resizing with AWS Lambda, S3 and API Gateway
01 Mar 2017
. category:
devops
.
Comments
#sysadmin
#aws
#lambda
#devops
#s3
#API gateway
This post will walk you through how you can create different image sizes which do not exist on the server after you uploaded the origin image to the AWS s3 storage. The goal of this post is to show you how you make use of AWS lambda function which means no servers (EC2 instances) will be required to perform these image resizing tasks. When an image gets uploaded to the original image bucket, then user request the different image sizes, the lambda function will get triggered which in turn will resize the image in different sizes e.g profile, cover and thumbnail sizes. Once Lambda is done with the resizing it will upload the different images to their corresponding buckets and reponse back to the user.
Architecture Overview

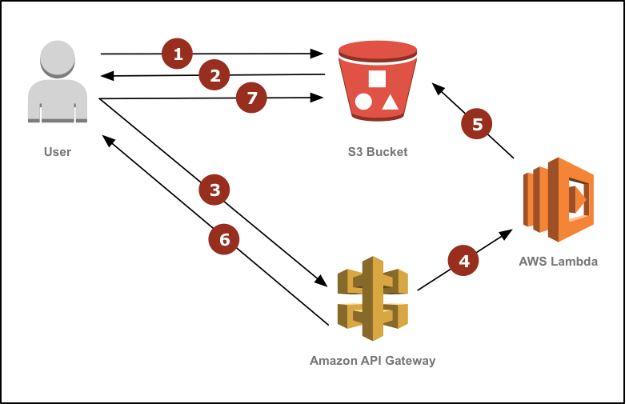
Below is the process:
1.A user requests a resized asset from an S3 bucket through its static website hosting endpoint. The bucket has a routing rule configured to redirect to the resize API any request for an object that cannot be found.
2.Because the resized asset does not exist in the bucket, the request is temporarily redirected to the resize API method.
3.The user’s browser follows the redirect and requests the resize operation via API Gateway.
4.The API Gateway method is configured to trigger a Lambda function to serve the request.
5.The Lambda function downloads the original image from the S3 bucket, resizes it, and uploads the resized image back into the bucket as the originally requested key.
6.When the Lambda function completes, API Gateway permanently redirects the user to the file stored in S3.
7.The user’s browser requests the now-available resized image from the S3 bucket. Subsequent requests from this and other users will be served directly from S3 and bypass the resize operation. If the resized image is deleted in the future, the above process repeats and the resized image is re-created and replaced into the S3 bucket.
Setup A working example with code is open source and available in the serverless-image-resizing GitHub repo. You can create the required resources by following the README directions, which use an AWS Serverless Application Model (AWS SAM) template, or manually following the directions below.
To create and configure the S3 bucket
1.In the S3 console, create a new S3 bucket. 2.Choose Permissions, Add Bucket Policy. Add a bucket policy to allow anonymous access.
{
 "Version": "2012-10-17",
 "Statement": [
  {
   "Sid": "AllowAnonymousAccess",
   "Effect": "Allow",
   "Principal": {
    "AWS": "*"
   },
   "Action": "s3:GetObject",
   "Resource": "arn:aws:s3:::YOUR-BUCKET-NAME/*"
  }
 ]
}
3.Choose Static Website Hosting, Enable website hosting and, for Index Document, enter index.html. 4.Choose Save. 5.Note the name of the bucket that you’ve created and the hostname in the Endpoint field.
To create the Lambda function
1.In the Lambda console, choose Create a Lambda function, Blank Function. 2.To select an integration, choose the dotted square and choose API Gateway. 3.To allow all users to invoke the API method, for Security, choose Open and then Next. 4.For Name, enter resize. For Code entry type, choose Upload a .ZIP file. 5.Choose Function package and upload the .ZIP file of the contents of the Lambda function. 6.To configure your function, for Environment variables, add two variables: ◦For Key, enter BUCKET; for Value,enter the bucket name that you created above. ◦For Key, enter URL; for Value, enter the endpoint field that you noted above, prefixed with http://.
7.To define the execution role permissions for the function, for Role, choose Create a custom role. Choose View Policy Document, Edit, Ok. 8.Replace YOUR_BUCKET_NAME_HERE with the name of the bucket that you’ve created and copy the following code into the policy document. Note that any leading spaces in your policy may cause a validation error.
{
  "Version": "2012-10-17",
  "Statement": [
    {
      "Effect": "Allow",
      "Action": [
        "logs:CreateLogGroup",
        "logs:CreateLogStream",
        "logs:PutLogEvents"
      ],
      "Resource": "arn:aws:logs:*:*:*"
    },
    {
      "Effect": "Allow",
      "Action": "s3:PutObject",
      "Resource": "arn:aws:s3:::__YOUR_BUCKET_NAME_HERE__/*"
    }
  ]
}
1.For Memory, choose 1536. For Timeout, enter 10 sec. Choose Next, Create function. 2.Choose Triggers, and note the hostname in the URL of your function.

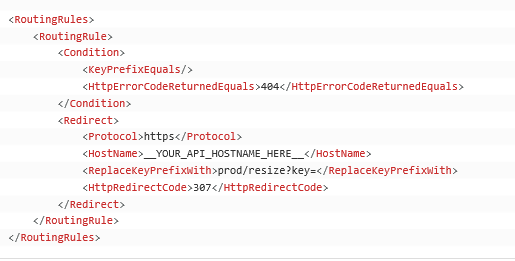
To set up the S3 redirection rule 1.In the S3 console, open the bucket that you created above. 2.Expand Static Website Hosting, Edit Redirection Rules. 3.Replace YOUR_API_HOSTNAME_HERE with the hostname that you noted above and copy the following into the redirection rules configuration:

Upload a test image and try retrieve resized versions of the image using your bucket’s static website hosting endpoint:
http://YOUR_BUCKET_WEBSITE_HOSTNAME_HERE/300×300/abc.jpg
http://YOUR_BUCKET_WEBSITE_HOSTNAME_HERE/600×600/abc.jpg
